
Making my own Wedding Dress
I am writing this in December 2021, exactly one year after officially starting to make my own wedding dress. Richard proposed in July 2020 and in November, we scheduled our wedding for early July 2021 with equal parts optimism and anxiety about what would unfold during the next seven months. So, here we were in December 2020, with our wedding date and venue confirmed (it would be outdoors) when Switzerland went into its second major lockdown, one that would force all non-essential business to close their doors and their employees, including us, to work from home until May.
Before re-discovering sewing as an adult, I wasn’t nearly as interested in fashion. While living in New York (which is synonymous to my pre-sewing years) I wore oversized, all-black clothing predominantly from the men’s section of COS and random sample sales. I found fashion intimidating, shopping exhausting, and online shopping impossible. When I started sewing my own bags (in 2019) and then clothes (2020) I began to see fashion and certain designers in a new light, and my free time became suddenly consumed with learning about the construction of clothes and re-discovering my own aesthetic. It felt like the first time EVER that I could ask myself “what do I want to wear?” because suddenly there were no constraints. My sewing room had no men’s or women’s sections, no size restrictions or associations, and no style, price tag or sustainability goal that seemed too out of reach.
Anyways, all this is to say that prior to getting engaged, I never thought much, if at all, about wedding dresses. I didn’t even know I wanted to wear one, and if I did, I certainly didn’t know what style. I was however, strangely convinced that I wanted to make whatever I wore to my wedding. I don’t know if this was a symptom of my aforementioned newfound fashion passion (again, this was winter of 2020, only a few months after finishing my first handmade dress ever–Birgitta Helmersson’s #zwgatherdress) or if it was a logistical choice; probably both. My other options at the time felt slim: I knew I couldn’t go wedding dress shopping locally since shops in Basel/Zurich would have been closed due to the lockdown. At the time, I didn’t feel comfortable or even excited about traveling home to New York to shop there. I researched businesses that let you rent dresses and others that let you pick several to be shipped to you so you can “shop” from your home. The problem for me with both of those options was Switzerland's super high import tax: so even renting or trying on a dress (or two, or three) could cost me over a thousand Swiss Francs just in VAT since the tax is based on the dresses’ actual value, not the rental or try-on fee. As stressful as making my own dress sounded, it still seemed less stressful and less unpredictable than finding one given the circumstances.
Again, one year has passed since this process began. I’ll describe it chronologically and do my best to include any resources that I found helpful along the way. I promise not to have rose-colored glasses in order to accurately depict my headspace at the time. It’s easy for me to look at photos today and say that making my own dress was so unbelievably satisfying, empowering, etc. which is true BUT it was also very stressful, emotional and time-consuming. I am not an expert by any means, so this is intended to be a journal entry about my experience rather than advice. I would do many things differently given the chance, and I’ll try to be honest about that.

CHOOSING THE PATTERN
November 2020
Long story short, I decided that I would wear a white dress. If you are trying to make this decision yourself, besides thinking about what would make you the most happy, special, comfortable, etc. my recommended listening/reading would be Avery Trufelman’s Wedding Dresses Article of Interest episode and also Jia Tolentino’s essay, I Thee Dread from her book Trick Mirror. I spent about a month casually immersed in photos of weddings and dresses (mostly enabled by just Googling the names of people whose style I look up to + “wedding”) as well as sewing patterns on Etsy. This month-long research phase was super helpful to establish what I liked and what was within the realm of reality for me to make.
Below were my final contenders for the sewing pattern. Unexpectedly, they date either from the 1930s or 1990s, but I believe there’s a consistent aesthetic to them: simple yet interesting silhouettes, drapey and understated fabric (not voluminous, lacey, embroidered, etc.)
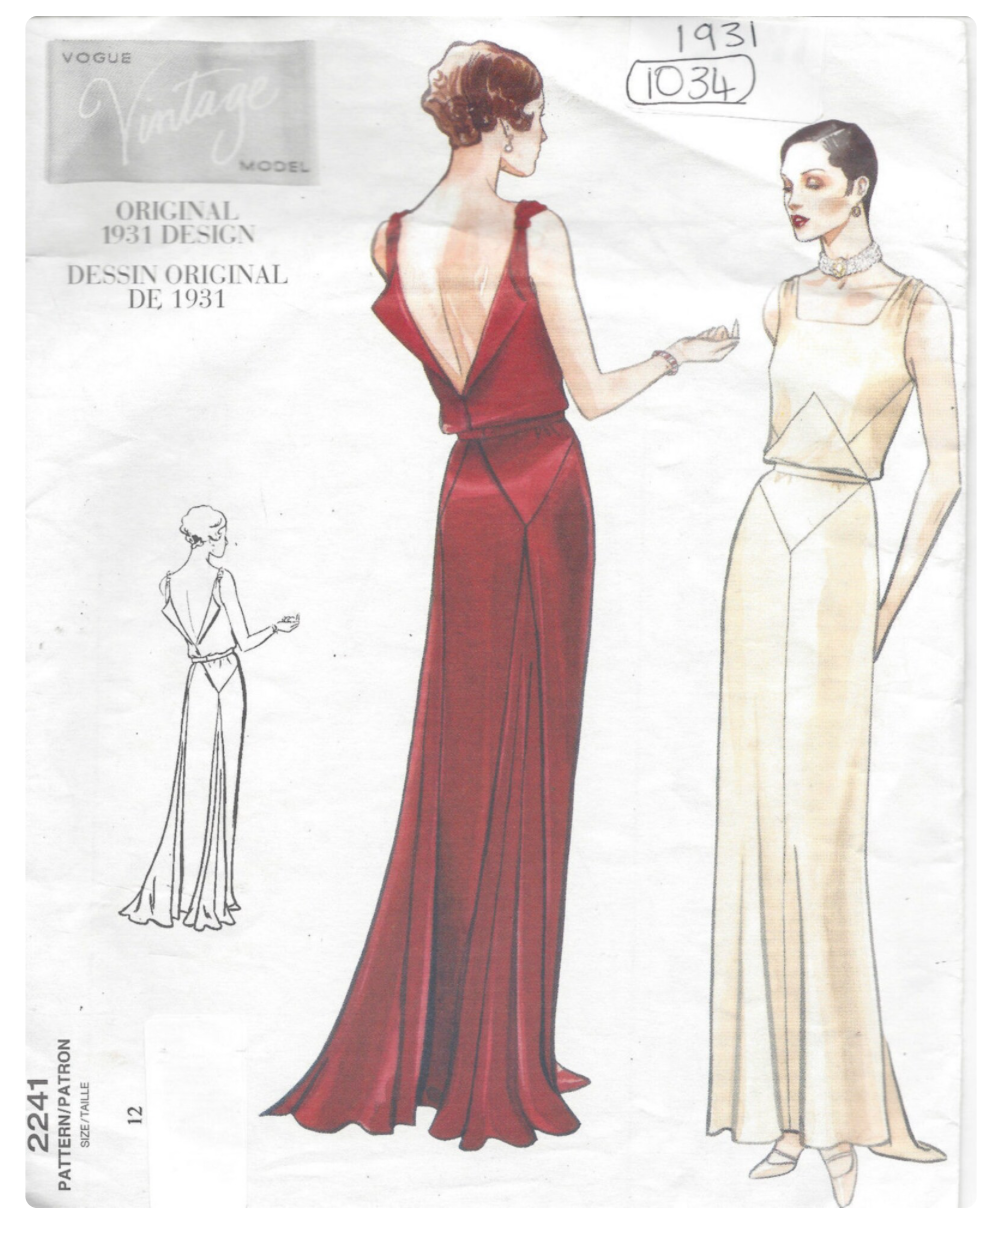
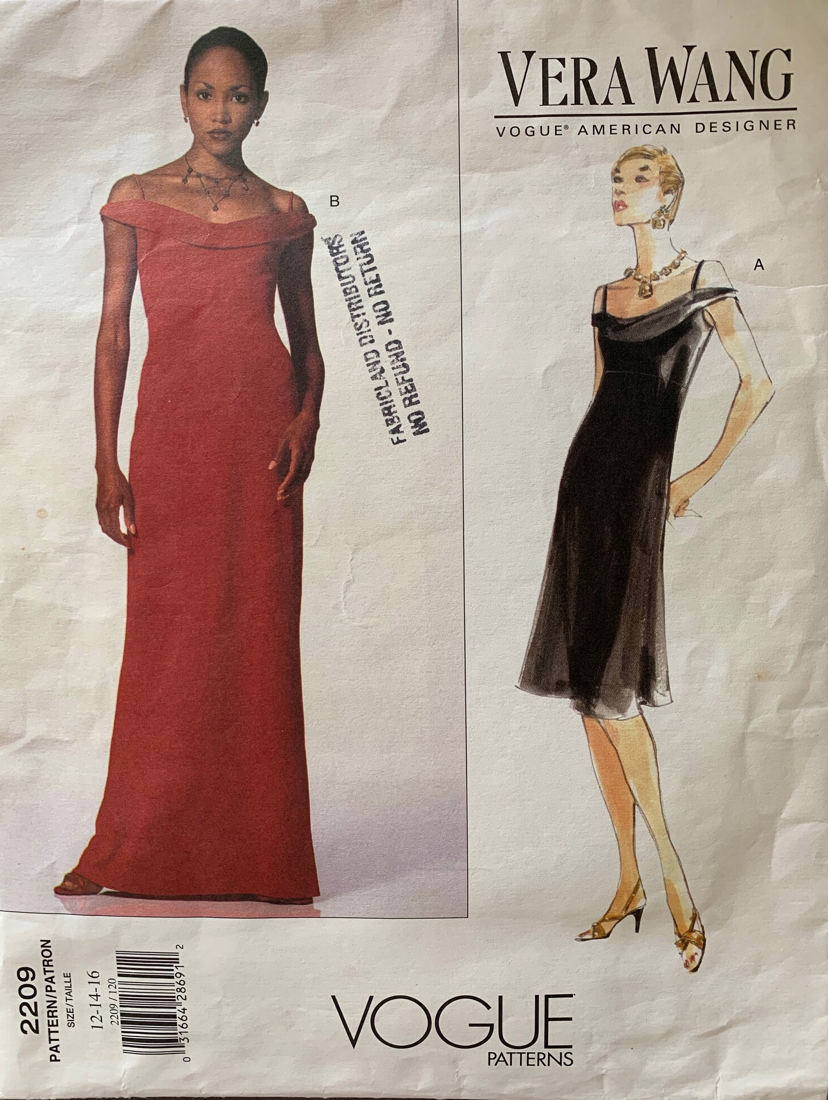

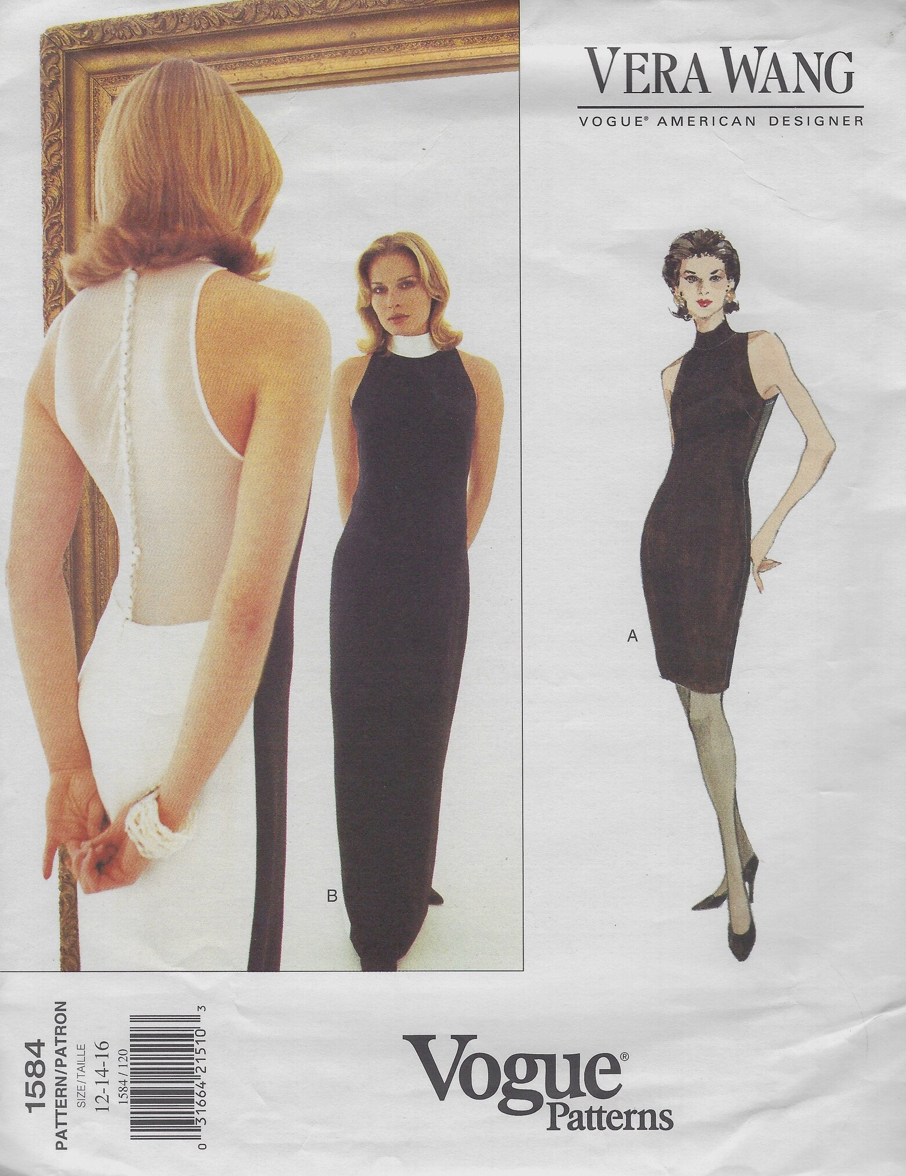


Around this time, I consulted two good friends, Heidi and Steph, who handmade a wedding dress and wore said wedding dress, respectively, about two years earlier. This dress, to me, was a huge success story so their input was invaluable. I had sent a few of these patterns to Heidi, to which she replied Ooh those are fun, I think you’ll be fine! They don’t look like they need too many layers or boning, I think you could do it. At the time, I didn’t know what boning was but I was relieved to hear I wouldn’t be doing it. Anyways, thank you to Heidi for the vote of confidence and also for the numerous resources and pieces of advice, some of which I’ll be recycling in upcoming paragraphs.
In late November, I made my decision and ordered the Alexander McQueen for Givenchy pattern ($64.75, including shipping): it’s an asymmetrical dress cut on the bias. The image on the left of the cover is from his Spring 1998 runway and the illustration on the right shows the subtle cowl back design, which I was obsessed with. You can visit the Pattern Vault site if you’re curious about McQueen’s stint at Givenchy and other patterns from this collection or Tany et la Mode’s blog to see her process of using the pattern to make a dress. When I was trying to decide between patterns I found it SUPER helpful to scrounge the internet and Instagram using the pattern’s name and/or serial number e.g. #vogue2157 #v2157 since I think illustrations on vintage patterns are often misleading as to how the garment will actually look.
MODIFYING THE PATTERN & TOILING
December 2020
The pattern arrived and it wasn’t in the best shape: it was pre-cut to a size 14 and I needed a size 12. At the time, I think there was an uncut version of the pattern available on etsy for $90, but I was hoping that the size 12 linework was still intact and it was worth saving $30, and for the most part it was. I spent one weekend tracing the original paper pattern using sturdy trace paper and pen, scanning the traced version (I was worried the feeders of the large-format scanner would shred the original pattern’s tissue paper to bits), and then digitally tracing the scan in AutoCAD. Digitizing the pattern is totally optional but since CAD is a software I use regularly in my job as an architect, I was just more comfortable about drafting any alterations to the pattern digitally rather than by hand.
We stayed in Basel for Christmas, so I found the time to make my first toile during our time off. I wanted to get my bearings on the pattern’s construction and fit, so I just used cheap IKEA cotton and didn’t yet make any modifications. As you can see from the photos, the fabric was too stiff to make the cowl in the back but I wasn’t so worried about that. My biggest concern was the neckline, which (I had already assumed from the photos on the pattern and Tany’s blog) wasn’t compatible with my small bust.
I made two more toiles after this one almost entirely devoted to reworking the neckline. The diagram shows the original and revised version of the front pattern piece overlaid. To be completely honest, I was a bit in over my head in this arena, but I googled a fair amount about the slash and spread method to remove volume in order to remove the cowled bust. The only change between my second and third toile was to raise the neckline even more in order to further differentiate the dress’s front and back.


Toile no.1 (neckline pinned in)

Toile no.2

CHOOSING THE FABRIC
January 2021
The pattern recommends making the dress twice: once in a crepe de chine and once more in a novelty sheer as the outer layer. I’ve never owned these fabric types in any clothing, let alone sewn with them, so I began another mini-research phase. For those who might not know, as I didn’t really before sewing, fabrics can be described by their weave type and/or by their fiber content. For example:
My tote bag is 100% cotton. (True–this is describing the fiber content.)
My tote bag is made from canvas. (Also true–this is describing the fabric’s weave.)
I want to buy more cotton canvas to make another bag. (Usually true! And also the most thorough way of describing fabric.)
Fabric weave types typically used in wedding dresses and veils (crepe de chine, satin, taffeta, organza, chiffon, tulle, etc.) historically were made with silk, but it’s not a given. So if you are shopping for wedding dress fabric, or any type of fabric, and you have a preference on both weave and fiber content, make sure you look for both listed in the product description. A fabric that might look like silk, described as “Satin”, could be (and oftentimes is) 100% polyester.
Heidi and Steph bought all of their fabric from Mood, so that’s where I started. You’ll have to forgive me when I say that I’ve never watched Project Runway, but if you have heard of Mood, maybe it’s because of this show. It’s a wholesale-turned-retail fabric store in NYC’s garment district that carries a lot of designer burnout/deadstock fabrics as well as their own label. If you’re curious about fabric types, their website is a good resource. For example, this is the fabric I was honing in on and you can see they have photos of it being worn on the runway and by customers, and they often have YouTube clips showing the fabric being handled so you can see its movement, drape, opacity, etc. If you’re going for something more ornate and are in the market for trimmings, lace, beads, etc. this is a comprehensive guide to the NYC garment district.
Since novelty fabric is typically pricey, I recommend shopping in person if possible. However, most fabric stores are happy to mail you swatches, and if not, maybe you have a very nice, trusted friend or family member that lives near a fabric store that can be your eyes and hands or pick up swatches for you. I ordered 11 swatches of my top fabric contenders from Mood ($26.50, including shipping) after exploring their selection and learning that white fabric comes in dozens of shades e.g. brilliant, antique, pearl, ivory, winter, whisper, tapioca, blush, etc.

February 2021
Ultimately, the swatches were very helpful to see how the fabric responded to light, to feel its texture, to see the subtly different shades against my skin, etc. Due to their small size, however, they’re not so helpful in illustrating the fabric’s drape and it’s a bit hard to tell their opacity. Anyways, I ended up ordering 4 yards of Antique White Silk Crepe de Chine ($103.96 at $25.99/yard) and 4 yards of Antique White Silk Chiffon ($59.96 at $14.99/yard). The pattern called for 3 ⅜ yards of each.
Around this time I also bought two spools of silk “almost white” Gütermann thread ($11.98) after reading that it’s more slippery than polyester/cotton thread, making it less likely to snag or tear the silk fabric. I also liked the idea of leaving a door open to someday dyeing the dress, and silk thread will take on color consistent with the silk fabric.
THE IMPORTANCE OF TAKING BREAKS
March 2021
My weekends and evenings in February and March were largely dedicated to releasing my first sewing pattern, the Zero Waste Wave bag (or ZWWave). I was totally obsessed with it and it felt “bad” to push the dress to the back burner but ultimately, I totally encourage taking breaks. Sewing my dress without occasionally making bags would feel like participating in Nathan’s Hot Dog Eating contest without being able to drink water. I needed these small sewing victories to relax, have fun, boost my confidence, etc. and wash down the anxieties and insecurities that might have been building from sewing the dress. If you are making your own wedding dress, it’s important to realize how draining (both physically and emotionally) it is, and to make sure you’re also taking breaks and taking care of yourself.
SEWING THE DRESS
April 2021
I recommend the following resources when it comes to “couture” sewing projects and working with silk/delicate fabrics:
Blog: Sewing Tips for Specialty Fabrics, Sew4Home
Blog: Sewing with Silk, Made to Sew
Podcast: Love to Sew, Episode 134: Sewing with Delicate Fabrics
Book: Couture Sewing Techniques, Clair Shaeffer
And YouTube! My search history around this time was exhaustive e.g. cutting shifty fabrics, sewing with silk chiffon, rolled hem, etc. Whatever technique you’re curious or scared about is most likely covered widely on YouTube.
I won’t go into too much detail about the actual sewing process because a lot of the information will be unique to my dress design but here are some tips that I hope are broadly applicable:
Invest in rotary scissors and/or a new rotary blade. Prior to this project, I always cut my fabric with scissors but novelty fabrics are usually so delicate and slippery that the simple act of lifting them up off the cutting surface with the blade will cause the fibers to shift, creating a slightly serrated edge.
Set up a good cutting surface. Fabric pieces for wedding dresses are usually quite large, and most of us probably don’t have an expansive and impeccably clean cutting table. I improvised by purchasing three A0-sized museum board/chipboard pieces that I laid on the floor to create a seamless surface that I treated as one large cutting mat. This worked great for me, as I have no pets or children running around and a few yoga blankets/bolsters to pad my knees. If you are cutting fabric up on a table, be careful that parts of the fabric aren’t dangling off the edge as this will warp the entire piece.
Invest in microtex/sharps needles (I found mine after a bit of a runaround at Coop–the generic Swiss grocery store chain–for $7.50). The needle point is super sharp and the needle diameter is quite small (60/8). For comparison, I usually only ever sew with a denim (100/16) needle. I read that it’s also helpful to also get silk/sharp pins. I didn’t and rather always hand-basted pieces together and/or pinned within the seam allowance.
Use scraps of silk to do test sews on your machine. I have a Singer Heavy Duty machine and I worried that it wouldn’t have a gentle-enough touch, but it was fine. I used a small seam length (~1-1.5mm) and low tension. Any tension issues (like a light waving effect) might only be perceivable after sewing for about a foot or longer so I would make sure your tests/scraps are large enough.
Avoid backstitching at the beginning and end of seams–I found that this overloads the fragile fabric with too many holes and thread, causing it to tear. I also always started sewing about 1cm in from the fabric edge while gently pulling on the threads to assure the seam started smoothly. Without doing this, the fabric would sometimes get gobbled down into the machine.
Try a walking foot attachment if you’re still having tension or feeding issues. I wish I had, but couldn’t find one locally that was compatible with my machine.
I would recommend french seams when possible for a clean, and “couture” finish. The pattern only called for them with the novelty shear layer so I followed this advice and did a slightly decorative serrated edge seam finish while making the crepe but would have liked them both to be french seamed in the end.
Always use a pressing cloth, low heat, and no steam/water when ironing silk.
If you make something cut on the bias, hang it up for at least 24 hours before hemming the bottom. Since a fabric has its greatest amount of fluidity and stretch on the bias, gravity will work on it and your dress length will grow (in my case, at least 5cm).
Have a Plan B! Making a wedding dress is no easy feat, especially if you, like me, have no experience with it. I’m lucky to have a supportive mom who cheered me along during the process but who also had kept her wedding dress in storage. If I had a complete sewing fail, I would have happily rocked this 1980s heirloom. Knowing about this back-up plan helped reduce my anxiety.
May 2021
Richard returned to the U.S. in May because his visa needed to be renewed, so I knew I had the whole month to take over the living room and do the majority of the final dress sewing. I should mention that up until this point, I was an open book when it came to the dress. He had seen the pattern and the toiles, but from here on out I wanted it to be a surprise. Luckily, Basel has a few random holidays in May so thanks to days like Christi Himmelfahrt I was able to finish the dress. (Himmelfahrt is one of my favorite German words. Himmel = sky/heaven, Fahrt = trip. In the U.S. I think Christi Himmelfahrt is called Ascension Day.) I love how each layer of the dress is only made from six pieces (two pieces for the front, two for the back and two straps) which you can see below.

My makeshift cutting surface and four pattern pieces.

First layer of the dress done! Now just needed to repeat it all (with french seams) with the chiffon fabric…
Detail of the seam finishing on the crepe de chine.

I altered the pattern for the second layer so it was about 2”/5cm longer which you see at the hem.

Detail of hand-rolled hem at the neckline and straps.

The chiffon hangs even lower than expected since it expands so much along the bias, but I liked this!

Back view of the dress, where the cowled design is more visible.
June 2021
I ended up having almost one meter left of both fabrics so I used the chiffon remnant to make a diamond shaped veil. In the end the dress was almost completely zero waste since every remnant ended up getting used as practice swatches or as ironing clothes! I finished the entire edge of the veil the same way I hemmed the dress, using this method. The icing on the cake was hand-stitching pearl beads on to it. This is largely invisible in every photo and I don’t know if it was worth the hours and hours of work but it did keep me busy on my totally empty NYC to Zurich flight—on which, by the way, I was randomly selected for a thorough drug check and acted SUPER suspicious when I squealed “please don’t go through that” when they came upon my box containing my dress. Luckily, they were very understandingand their gloves were clean.


SUMMARY
Thank you for making this far in my hopefully not-too-rambly recounting of the process. Although I sprinkled a lot of information throughout the previous paragraphs, here is a consolidated list of the supplies, tools, and materials I needed to make the dress:
Already Owned
Sewing machine
Bobbins
Hand sewing needle
Cutting mat
Trace paper
Scissors
Ruler
Tape measureMuslin/cotton fabric for toiling
Iron
Ironing board
Purchased
Sewing Pattern
Fabric sample swatches
Silk fabrics for final dress
Silk remnant to use as a protective ironing cloth
Silk thread
Microtex (Sharp) needles
Rotary Cutter
Pearl beads
Total spent on the above: $325** (including shipping and duties)
**Disclaimer to this figure: it would be misleading to say that the dress cost me $325 because this number doesn't take my labor (100+ hours), the expenses of the materials involved in creating toiles/mock-ups, and the cost of all the equipment I already own that made the dress possible.
If by any chance, you are wondering about any other aspects of the ensemble, I am happy to share as I would recommend all of them wholeheartedly:
Shoes: Alohas. This was the first thing I’ve bought off an Instagram ad and I have no regrets. They were super comfortable and I actually never, ever wear heels.
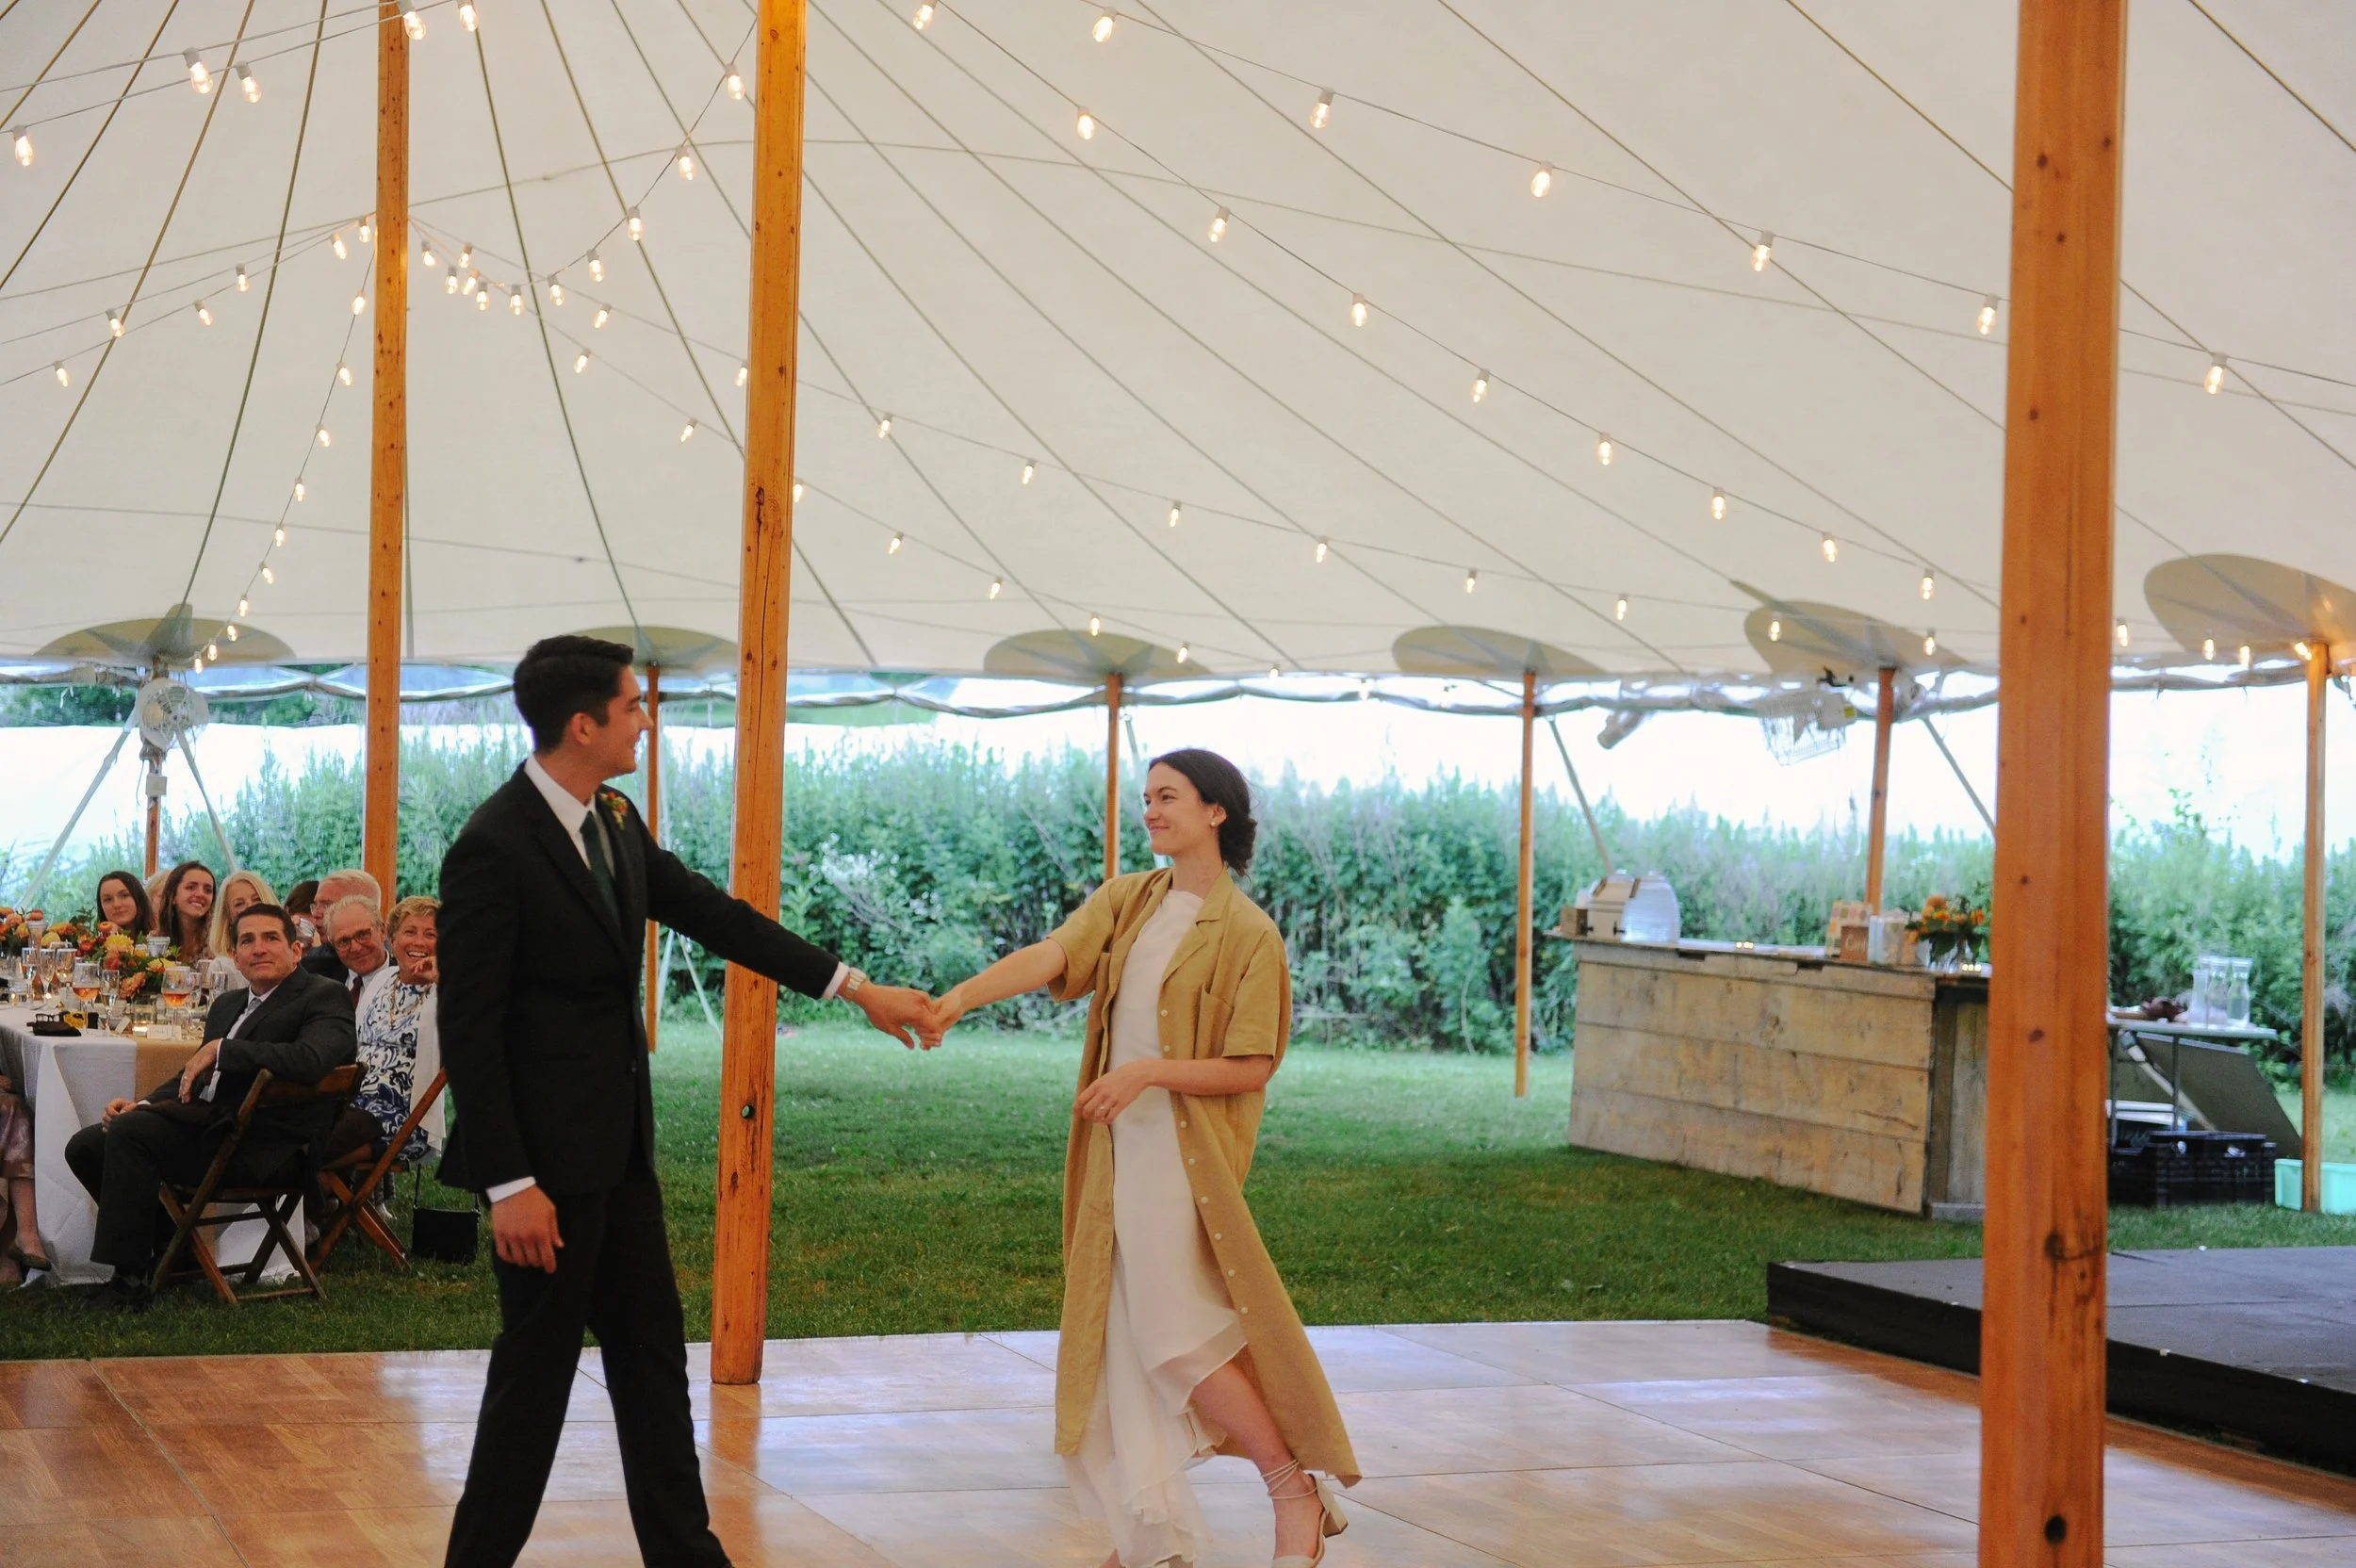
Duster/Dress: Ilana Kohn, purchased at a sample sale (oh how I’ve missed you!) in Brooklyn, where I coincidentally met the lovely Lydia @the_swiss_sewing_machine in line.
Hair clip/veil holder: Sylvain le Hen via Rennes. (Both this and the Ilana Kohn dress were a bit of a spurge but purchased on the premise that they would be worn consistently outside the context of our wedding, which I’m happy to report is true!)
Dream bouquet: Fox Fodder Farm (thank you Riley!)
Richard’s tie: Seigo Neckware, who is quoted in this NYTime’s article saying “each tie is our baby” :,,)


If I were to do it all over again, (which I surely won’t, but if…) I think I would make two major changes: the first being to give myself more time. From the time the pattern arrived to the time I was traveling home to the U.S. was five months–and during these months, I was working full-time (albeit at home; I’d occasionally squeeze in sewing during lunch breaks) as well as planning all the other wedding-related things with Richard. The second major change would be to the dress’s base layer fabric choice. Although the pattern calls for crepe de chine and Mood claims this particular fabric is opaque, it sewed up more translucent and lightweight than expected. I do love how my dress turned out, but the translucent aspect was a real problem. I spent much of June (aka, one month before the wedding) on a mad hunt for the appropriate undergarments and found this impossible, so making trips to my parent’s apartment to use their sewing machine and hack some Spanx became a whole separate project in the 11th hour. We also got lucky and a heat wave that was blowing through the east coast broke days before our wedding, so we had an unseasonably comfortable 70°F (21°C) day. In retrospect, it would have been a disaster, (in a horrible, wet t-shirt kind of way) if it had still been 95°F (35°C)+ degrees. Anyways, if you’re planning a summer or outdoor wedding, I would let yourself be a little bit less blindly optimistic than I was so you’re more prepared for worst-case scenarios. Aside from the opacity problem, the crepe fabric was also slightly more lightweight than hoped, and revisiting photos of the toiles led me to miss the structure and volume in the asymmetric gown part of the dress. Perhaps, if I ever remake this pattern for a special occasion, I’ll use a more mid-weight fabric, and hopefully actually be able to shop for it in person!
All this is to say, the dress wasn’t technically perfect, but my memory of the day we got married is, and the dress was just one aspect of that. I’m a very self-critical person so it was easy for me to notice the parts of the dress I would improve upon, but ultimately I was so comfortable and happy wearing it. It felt “me” in a very special, custom-made way.
Thanks again for reading and I hope you found some helpful resources or at least some assurances if you’re choosing to make your own dress. Try to remember that a wedding isn’t about the dress but about your love and how love brings people together! I would often remind myself of this when the pressure was creeping up on me. It was such an empowering learning experience (as I suppose most sewing projects are) but exponentially so, due to the considerable technical and emotional effort required. Good luck; you can do it!
Lastly, thank you to our good friend Andrew Fu for the amazing wedding photos!